Hello and welcome to #root.bg!
Here you can find tutorials about linux, networks and their firewall, games and fun, as well as hobbies – rollers, drones and many more.
Here you can find tutorials about linux, networks and their firewall, games and fun, as well as hobbies – rollers, drones and many more.
Николай Николов Howto apache, iptables, librenms, monitoring, mysql, netdata, netstat, nginx, php, webserver 0
Hi,
In this post I will share about the most commonly used methods by me for the so-called webserver monitoring.
The idea is clear – as a web administrator, it is very important for me to always know what is happening behind the wheel of the web server.
A typical example of the need for monitoring is when our server has lifted a high load, and we need to understand where it comes from.
netstat is my best friend in such situations. Over the years I have improved in its use and I have found the best combination of parameters with which to easily find out which server my “flood” is.
netstat -tn 2>/dev/null | grep ':80 ' | awk '{print $5}' | cut -f1 -d: | sort | uniq -c | sort -rn | head
And the result is :
[root@web ~]# netstat -tn 2>/dev/null | grep ':80 ' | awk '{print $5}' | cut -f1 -d: | sort | uniq -c | sort -rn | head
47 104.31.11.*
25 86.229.74.*
12 109.133.39.*
12 104.20.209.*
10 94.225.141.*
10 213.219.168.*
7 84.198.179.*
7 81.82.83.*
7 68.180.228.*
7 213.119.25.*
The same combination can be used for port 443 !!
The alternative of netstat is command : ss
When we have IP addresses, you can quickly and easily through whois find out who is coming from where and take appropriate action.
And we can block them :
iptables -I INPUT -s $IP -j DROP
It is very important to properly rely on the logs of the web server. We are often attacked by so-called “bots” that open wp-login.php and try to enter our wordpress. However, each such attempt opens a new request to our php and mysql servers, and “eats” CPU time and memory.
You can read details in my previous post wordpress wp-login.php attack
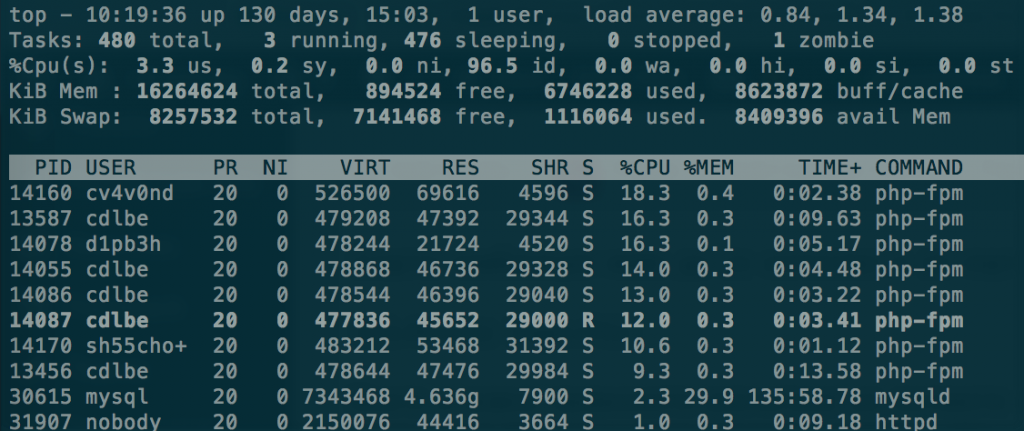
top is the command I use most often for real-time monitoring – it shows me which process loads our server the most and so I can easily find out where to look for the problem.
mytop is an alternative to top specialized in monitoring mysql servers. Through it we can monitor the requests in real time on the machine, as we can kill directly by IDs, monitor replication (if any) and much more!
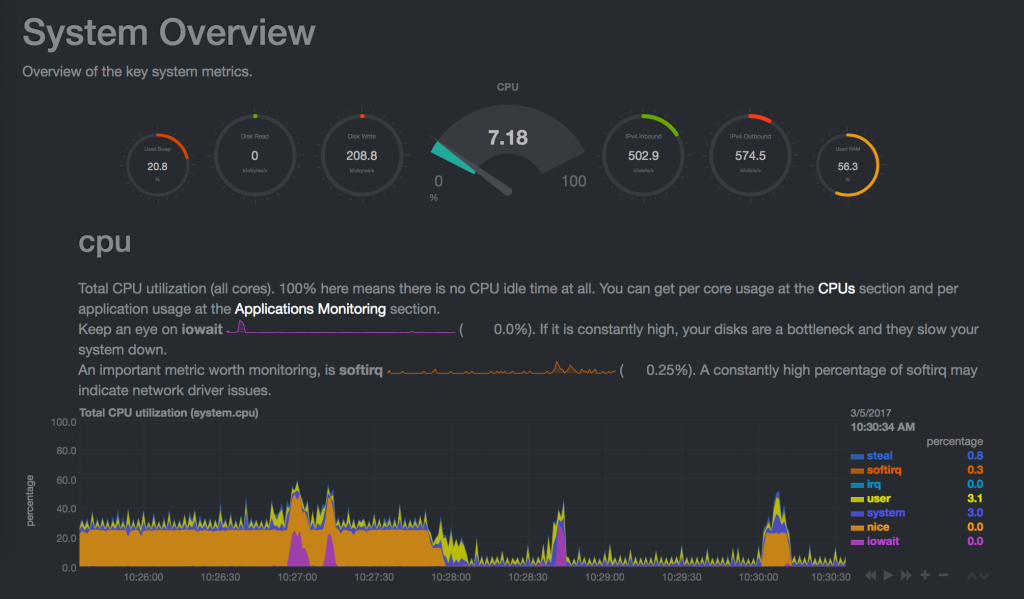
Of course, where are we without the graphics.
I personally use LibreNMS and Netdata to monitor my servers and draw their graphs.


I used cacti for many years, but for a number of reasons I migrated to LibreNMS (formerly Observium)
Of course, there are many other ways to monitor our web server, but for me the ones listed above are the best.
Here is a link to an article with many useful Linux commands.
Николай Николов Howto master, mysql, replication, slave 0
 Привет,
Днес ми се наложи да направя промяна в един MySQL cluster, като трябваше да включа нов междинен master/slave сървър :
[master]->[master/slave]->slave
За тази цел смених master_host-а на “slave” сървъра от “master” на “master/slave” и промених binlog-а и позицията.
Да, но се натъкнах на следният проблем:
master/slave сървъра продължаваше да взима актуални данни от master-a, но сам по себеси не обновяваше своята master позиция, и така slave сървъра изостана от master-a.
mysql> show master status;
+------------------+----------+--------------+------------------+-------------------+
| File | Position | Binlog_Do_DB | Binlog_Ignore_DB | Executed_Gtid_Set |
+------------------+----------+--------------+------------------+-------------------+
| mysql-bin.000002 | 120 | | | |
+------------------+----------+--------------+------------------+-------------------+
1 row in set (0.00 sec)
От документацията на MySQL разбрах, че този проблем се оправя с опцията :
log-slave-updates
която трябва да бъде добавена в my.cnf на сървъра играещ ролята на master/slave в секция [mysqld].
След рестарт на mysql демона, позицията взе да се променя и репликацията към slave тръгна.
mysql> show master status ;
+------------------+----------+--------------+------------------+-------------------+
| File | Position | Binlog_Do_DB | Binlog_Ignore_DB | Executed_Gtid_Set |
+------------------+----------+--------------+------------------+-------------------+
| mysql-bin.000003 | 7582729 | | | |
+------------------+----------+--------------+------------------+-------------------+
1 row in set (0.00 sec)
Това е!!
Николай Николов Работа docker, freenas, proxmox, qcow2 0
Привет,
Днес ще споделя за проблем който се случи на уеб сървъра на www.root.bg.
Тази сутрин мейла за ежеседмичният бекъп на виртуалните машини включваше :
vzdump backup status : backup failed.
Оказа се, че бекъпа на web.root.bg е фейлнал:
104 web.root.bg FAILED 00:59:54 VM 104 not running
и сървъра е спрял.
Сутринта пуснах сървъра и тръгнах да търся причината за проблема от логовете.
Реших да направя snapshot на работещата машина, но малко след като го пуснах се сетих, че нямам излишно място на proxmox сървъра за този snapshot, и за това го спрях.
Тук обаче нещо се обърка.
web-root:~# dmesg
-bash: dmesg: command not found
web-root:~# reboot
-bash: reboot: command not found
web-root:~# logout
-bash: /root/.bash_logout: Input/output error
-bash: /etc/bash.bash_logout: Input/output error
В терминала на машината излизаше, че reiserfs-a е крашнал и сървъра не реагираше на нищо.
Реших да го ресетна, но резултата не беше този който очаквах :
~# qm start 104
kvm: -drive file=/var/lib/vz/images/104/vm-104-disk-1.qcow2,if=none,id=drive-virtio0,format=qcow2,cache=none,aio=native,detect-zeroes=on: qcow2: Image is corrupt; cannot be opened read/write

Опитах да поправя счупеният qcow2 диск като следвах стъпките от този сайт. За съжеление и това не помогна :
anna:/var/lib/vz/images/104# mv vm-104-disk-1.qcow2 bad_104.qcow2
anna:/var/lib/vz/images/104# qemu-nbd --connect=/dev/nbd0 bad_104.qcow2
Failed to blk_new_open 'bad_104.qcow2': qcow2: Image is corrupt; cannot be opened read/write
Бях в ситуация в която нямаше как да възтановя boot диск-а на web.root.bg.
Вариянтите бяха два:
Разбира се, писах за проблема на стената на сайта във facebook и twitter, както и в status.root.bg.
Реших да пробвам първо със стъпка 2, като си забазих втория qcow2 файл (където реално ми е /var на web.root.bg), за да нямам загуба на данни на базата и файловете на сайта.
След 40 минути възтановяване на двата qcow2 файла, всичко мина успешно.
Върнах предварително запазеният ми vm-104-disk-2.qcow2 файл и пуснах машината – УРА – всичко тръгна по старо му!
Това което смятам да направя следващата седмица, е да разделя web и database частта на сървъра в docker инстанции.
За целта ще направя нов виртуален сървър и ще започна тестовете там. В работата успешно внедрихме docker на няколко production инстанции и сме много доволни за сега от него.
Така че, здравей docker!
Николай Николов Howto kvm, libvirtd, linux, ubuntu 0
Привет,
Днес темата е ubuntu 16.04 kvm howto, или по-точно с какви проблеми се слбъсках след инсталацията.

Инсталация като е елементарна :
sudo apt-get install qemu-kvm libvirt-bin virtinst bridge-utils cpu-checker
Особенно е, че трябва да се направи bridge на интерфейса който ще използваме към виртуалните машини. При мен това беше eth1 , а /etc/network/interfaces след включването на bridge-a изглеждаше по този начин :
auto br1
iface br1 inet static
address 192.168.168.1
network 192.168.168.0
netmask 255.255.255.0
broadcast 192.168.168.255
bridge_ports eth1
bridge_stp off
bridge_fd 0
Важно да спомена, че това не е главният интерфейс на сървъра и съответно няма default gateway.
До тук всичко точно и лесно, обаче проблемите започнаха да идват един след друг.
За самото управление на KVM (Kernel-based Virtual Machine) средата исках да използвам програмата virt-manager (има я и за MacOS). За тази цел трябваше да пусна демона libvirtd да слуша на tcp порт.
В противен случай дава следната грешка при опит за връзка към сървъра от страна на virt-manager : Verify that the ‘libvirtd’ daemon is running
Добавя се следният ред в /etc/default/libvirt-bin :
libvirtd_opts="-l"
и демона вече може да бъде достъпван отвън. Хубаво е да се сложи и точно орпеделено айпи на което да работи с цел сигурност.
Тук излезе и следващият проблем : /etc/init.d/libvirt-bin не искаше да се страртира вече, защото даваше грешка :
Jan 18 00:12:16 border libvirtd[3021]: Cannot read CA certificate '/etc/pki/CA/cacert.pem': No such file or directory
Jan 18 00:12:16 border systemd[1]: libvirt-bin.service: Main process exited, code=exited, status=6/NOTCONFIGURED
Jan 18 00:12:16 border systemd[1]: Failed to start Virtualization daemon.
Оказа се, че бях пропуснал да инсталирам сертификат които libvirtd искаше да имам задължително. Използвах стъпките от http://libvirt.org/ и си създадох сертификатите.
След това вече можех да стартирам процеса libvirt-bin и да се свържа към сървъра чрез virt-manager.
Всичко останало мина по план, и успях да инсталирам виртуална машина с Windows 10 без проблеми.
Това е за сега!